Demystify Queues and Their Real-World Applications
Today, we’re going to learn about the queue data structure, practically !
What the heck is a Queue?
A queue is a fundamental data structure. It uses the “first in, first out”(FIFO) principle.
Queues have two main operations (or you can think of them as functions in programming contexts):
- Enqueue: This operation adds an element to the back of the queue.
- Dequeue: This operation removes and returns the element from the front of the queue.
A queue ensures that the element that has been in the queue the longest (i.e., the one at the front) is the next one to be removed. New elements are always added to the back.
Let’s use a simple real-life example to illustrate how a queue works:
Imagine you’re waiting in line to buy movie tickets. The line represents a queue, and each person in the line is like an element in the queue. Here’s how the queue operations play out:
- Enqueue: As people arrive, they join the back of the line. So, the first person who arrives is at the front of the line and will be the first to buy a ticket. The second person arrives and stands behind the first person, the third person stands behind the second person, and so on. This is the process of enqueueing, where people are added to the back of the line.
- Dequeue: The ticket seller starts serving customers. The first person in the line gets to the counter, buys a ticket, and leaves the line. This is the process of dequeueing. Now, the second person becomes the first in line, and they step forward to the counter to buy a ticket. This continues until everyone has bought their tickets.
Queues are often used to process data in a particular order. A popular example I’m sure you’ve heard of is Kafka , a messaging broker.
Implementing a Queue
With JavaScript, implementing queues is very straightforward. We can implement them with Arrays using the built in methods.
Let’s implement a queue class with the enqueue and dequeue methods.
class Queue {  constructor() {    this.items = [];  }
enqueue(item) {this.items.push(item);}
dequeue() {if (this.isEmpty()) {return null;}return this.items.shift();}
isEmpty() {return this.items.length === 0;}}
// Example usageconst myQueueDS = new Queue();
myQueueDS.enqueue(10);myQueueDS.enqueue(20);myQueueDS.enqueue(30);
// console.log(myQueueDS.items) -> Output: [10,20,30]
// console.log("Dequeued:", myQueueDS.dequeue()) -> Output: 10
We implement an
isEmptyfunction which simply checks if the queue is empty or not which is useful as we don’t want to have an index out of bounds error.
Now that we’ve implemented the queue, let’s move onto a practical example.
What are we building?
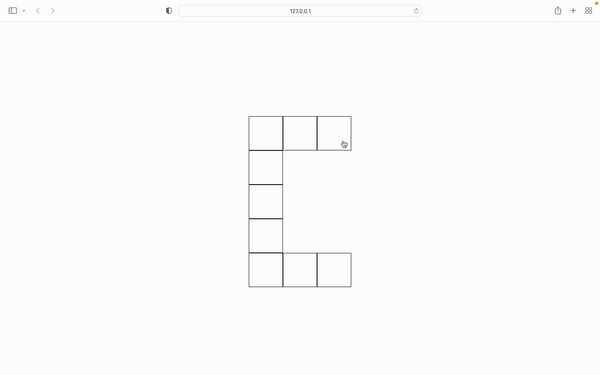
We will be building a web app called “remember”. It’s a simple app that remembers the order boxes were selected and deselects them after a wait. Here’s what it looks like:
Getting Started
In your terminal, clone the starter-files branch with the following command:
git clone -b https://github.com/glamboyosa/remember.gitYou should have an index.html file that looks like this:
<!DOCTYPE html><html lang="en">  <head>    <meta charset="UTF-8" />    <meta http-equiv="X-UA-Compatible" content="IE=edge" />    <meta name="viewport" content="width=device-width, initial-scale=1.0" />    <title>Remember</title>    <style>      body {        display: flex;        justify-content: center;        align-items: center;        height: 100vh;        cursor: pointer;      }      .flex-container {        display: flex;        flex-direction: row-reverse;      }      .flex-container-col {        display: flex;        flex-direction: column-reverse;      }      .box {        width: 80px;        height: 80px;        border: 1px solid black;      }      .box.green {        background-color: green;      }    </style>  </head>  <body>    <main>      <div class="flex-container">        <div class="box"></div>        <div class="box"></div>        <div class="box"></div>      </div>      <div class="flex-container-col">        <div class="box"></div>        <div class="box"></div>        <div class="box"></div>      </div>      <div class="flex-container">        <div class="box"></div>        <div class="box"></div>        <div class="box"></div>      </div>    </main>    <script>      const boxes = [];
      const main = document.querySelector("main");
      main.addEventListener("click", (e) => {});    </script>  </body></html>
We have a main tag with a few flex container divs, that style the boxes in the “crossword puzzle” style.
We have a script tag and within it, an empty array which will act as our queue then, we simply grab the main and listen for any clicks.
Enqueue Boxes
The first step is to enqueue our boxes. Copy the following code:
main.addEventListener("click", (e) => { const box = e.target; if (box.tagName === "DIV" && box.classList.contains("box")) { box.style.pointerEvents = "none"; box.classList.add("green"); boxes.push(box); } else { return; }});Here, we get the element that was clicked and set it to box and then we check if the element’s tagName is a div and if it contains the box className as this helps us know it’s the box element we want to grab.
If it is, we enqueue it via the push method, add the green class (this just sets the background to green) and set it’s pointer events to “none”. If this condition isn’t met e.g. user clicks the main element, we just do nothing.
NOTE: The pointer-events CSS property sets under what circumstances (if any) a particular graphic element can become the target of pointer events.
Dequeueing boxes
Now, it’s time for the magic. We want to deselect the boxes once we’ve selected them all.
For this, paste the following code underneath boxes.push(box)
// we've filled in everythingif (boxes.length === 9) { // every 300 ms remove in order it was entered in const interval = setInterval(() => { const box = boxes.shift(); box.classList.remove("green"); box.style.pointerEvents = "auto"; if (boxes.length === 0) { clearInterval(interval); } }, 400);}Here, we check if the size of the queue equals the total number of boxes and if it does, every 300ms, we dequeue elements using the shift method.
We also ensure to remove the “green” className, this reverts the background back to white and is responsible for the cool animation and we also revert the pointer-events.
If the list is empty, we simply clear the interval.
Your entire script tag, should look like this:
<script>  const boxes = [];
  const main = document.querySelector("main");
  main.addEventListener("click", (e) => {    const box = e.target;    if (box.tagName === "DIV" && box.classList.contains("box")) {      box.style.pointerEvents = "none";      box.classList.add("green");      boxes.push(box);      // we've filled in everything      if (boxes.length === 9) {        // every 300 ms remove in order it was entered in        const interval = setInterval(() => {          const box = boxes.shift();          box.classList.remove("green");          box.style.pointerEvents = "auto";          if (boxes.length === 0) {            clearInterval(interval);          }        }, 400);      }    } else {      return;    }  });</script>
Conclusion
There you have it, we’ve learnt about queues, implemented them in JS and also created a practical minimal example. For further reading:- Pointer Events : MDN article on pointer-events
- Remember Repo : The Remember GitHub Repo.
Image gotten from Unsplash